Tuesday, February 22, 2011

The Hoop House Demise

Yet again, the wet heavy snow has decimated my little hoop house structure.

Hoop House Collapse

My structure obviously needs re-structuring. I made it of PVC with short sections connecting each hoop at the top. I had decided to NOT use PVC glue, as I wanted to be able to dismantle the whole thing come summer. Unfortunately, this has lead to easy spots for disconnect when the snow gets heavy. I also didn't clip the plastic sheeting to the individual hoops, as I had done on my small hoop structure last year. The plastic is not as taught as I would have liked, also leading to the current structure fail. Well, we live and learn. By next fall, I hope to have a more permanent structure (aka - small green house) put up, made of reclaimed window sashes. Or possibly another hoop house, but this time made of metal conduit and wood ends, to aid structural integrity.

Luckily, my plans of winter gardening this year did not come to fruition, due to travel. Otherwise, the downed structure (with almost every snow fall) would have been more heart wrenching. So far I've only put some potatoes in buckets and there are a few small pots of herbs that are overwintering in there.

Hoop House On a Good Day (and the girls enjoying some range time!)

Monday, February 21, 2011

Annie's Project - New Jersey

This year, New Jersey is hosting "Annie's Project" Classes!

So what is Annie's Project?? Well, it is an educational program dedicated to strengthening women's roles in the modern farm enterprise. Annie's Project's mission is:
"To empower farm women to be better business partners through networks and by managing and organizing critical information."

To learn more about Annie's Project or to find out if classes are available in your state: Annie's Project

Unfortunately I missed the first class, as I was visiting friends in Ontario. They went over writing a business plan. Sorry I missed that, but I am awaiting presentation notes from our County Ag Agent. Last week we discussed the importance of marketing and using social media. So now I have a twitter account, and I am more determined to keep up my blogging. Maybe even start a Face Book page for my little business.

Here is the Press Release from Rutgers!
Rutgers Launches First-Ever "Annie’s Project" in New Jersey

I am so glad I have the opportunity to take this class! Though I do not currently have a farm, or work on a farm, and I only do small scale private garden maintenance (aka - weed pulling for other people), I think the information I will gain will become invaluable to me in the coming years, as I get closer to my ultimate life goal of small scale farming in Prince Edward Island, Canada. (Or maybe somewhere in eastern Ontario...or possibly the Adirondacks!) I will also be able to apply the general, practical business knowledge to my current business.

Saturday, February 19, 2011

Sweet Tater Slips Update

Well, after a month of waiting for it to sprout...so far - only roots! And such lovely roots they are. My grocery store sweet potato I now believe was most likely treated with some anti-sprouting medium. Also, the water turned cloudy, and while changing the water I discovered that the entire potato has turned to mush! Lovely roots, mushy potato. Time for it to go into the compost pile.


Luckily, I had a few other sweet potatoes on the counter that had started to sprout, so I cut the end off of three of them, stuck them in water (just like my previous potato) and VOILA! Sprouts!


I'm going to give them another week or two before cutting them off and rooting them. Hopefully I will be able to get a half dozen slips or so to plant.

Now on to starting my seeds...Today it will be the various lettuces that I've collected (Okay - I'm a seed hoarder...I admit it! But I refuse an intervention.), radishes, onions (a new thing for this year - trying to start them from seed), leeks, arugula, and Ramapo tomatoes.

Thursday, January 20, 2011

New Sprouts!

Well, it has been too long since I have blogged. Just couldn't seem to find anything interesting to blog about.

It was a long hot summer. The gardening business was good - lots of weeds this year! But I neglected my own gardens more than I had intended.

As usual, this year is starting out with HUGE plans, or as most would call them, "Delusions of Grandeur." This year's hoop house has increased in size. It did collapse under the Christmas snowfall. I already have plans for a new, more permanent, greenhouse made up of old windows. I've got the windows, and finally have a plan. I will make sure to document my progress.

A few days ago, I took inventory of my seeds. A whopping 48 varieties - and that is just the veggies! Where ever will I put everything? New beds of course! One more project to add to the list. The ten or so flower varieties, will all be tossed into the Slope Garden with the rest of the wildflowers. Maybe this year the empty spaces will fill in.

Two new experiments are in the works. Sprouting my own sweet potato and sprouting flax seed. The sweet potato came about because buying slips just isn't in the budget and the minimum order is way more than my small household would ever need. The flax sprouts are to supplement my chickens' diet for the winter. They are much happier with more greens in their lives. (I also just discovered yesterday, to my shame, that the two girls I thought were Cochins, are in fact, Light Brahmas! Well, it just goes to show that one can never know everything about a subject! I will be breaking the news to them later today.)

Back to plantings... In order to grow my own sweet potato slips, I scoured the internet for directions. The simplest one was to suspend a store bought sweet potato in a jar of water. I took an old sweet potato, 2 small bamboo skewers, and an empty glass. I broke the skewers in half and stuck them into the top 1/3 of the potato so it would be suspended in the center of the jar. Then I filled it with water and placed the jar in a sunny spot. Within a few days, it already has two nice white roots! When there are several more, and they are about 6 inches long, I will snip them off, and put them in their own little pools, until they sprout. Then they will be ready for planting.


For sprouting the flax seed, I put perlite into two 6 inch plastic saucers (you know the kind that you put under pots?) and dampened it. I spread the flax seeds sparingly on the top, then covered them with a second saucer. I placed them in a dim warm spot. After just 12 hours, some of the seeds have already broken open. They just need to stay moist and when they have all started sprouting, they can be put in a sunny spot.


The gardening is beginning!

Tuesday, June 15, 2010

"Thank you for dining with us....

Please - DON'T COME AGAIN!"

Something was eating my collards...but what are a few holes in the leaves among friends? UNTIL - there were more holes than leaves...

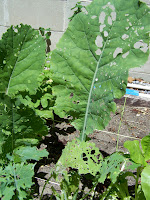
Upon turning over a leaf (not a new one...just an old one) I saw one of the culprits - a small green worm like critter that was munching away at my collards.

Well, I had seen some white cabbage moths flitting around a week so before...I fed those few holey leaves to my chickens and they just gobbled them up! They really LOVE collards!

A few days later, I was looking at the garden...and almost ALL of my collards looked like they'd been shot with buckshot! How many more cabbage moth worms are there? I didn't only find the familiar little green guys...to my complete surprise, I found a bunch of these...


Meet The Cross-Striped Cabbageworm! Kind of a pretty little thing really. The adult cross-striped cabbageworm (moth) isn't so pretty - sort of pale yellowish-brown.

So, what about it? Well, the cross-striped cabbageworm (from here on out referred to as CSC to enable me to type quicker...) are enamoured with cabbage (hence the name!), collards, turnips, cauliflower, broccoli...and any other related crops! Oh joy! I had turnips, from my hoop house, but they bolted so I ripped them out...but I still have collards and cabbage! UGH!!

Sigh...so what do these little buggers do?

Well, the larvae will eat very large oval shaped holes in the leaves and can burrow into a developing cabbage head. This would be no big deal if I had acres and acres of collards and cabbage...but not so great when you have a small veggie patch in your backyard. No wonder they just decimated everything in their path! When I found particularly infested leaves and stalks, I carefully plucked them, and fed them, leaves and all, to my chickens! My two Cochin pullets ate them like candy! Plucking them off one by one before even bothering with the greens!

But for those of you without chickens...you can hand pick the CSC's from your crops - and then DESTROY THEM!! Don't just knock them to the ground...they will find their way back. And since they can overwinter in their pupal stage, just beneath the soil...you may want to destroy all that is left after you have harvested the heads or leaves you desire. You can plow them under, but I'd prefer to destroy them. Another method, as suggested by the Rutger's Cooperative Extension is to use" parasites, predators and parasitoid wasps to help control the CSCs"...but with a small plot, hand picking will probably be sufficient, though time consuming. Using Bt can also be beneficial - if you are inclined to use pesticides.

As for me, I've pulled up my collards, fed the remaining to my chooks, and am closely watching the smaller collards and my lovely Swiss chard - that is just about ready for some harvesting...found a few on them too...luckily my chooks love greens!! And CSCs! Happy Hunting!

Sunday, May 30, 2010

Gardens Update!

Wow - have I been gardening up a storm for the last month and a half...unfortunately, it has only been minimally on my own gardens!! My clients' gardens are looking splendid, so at least I am doing my job.

My own gardens have also been doing well without me! Guess that is a good thing. My "Slope Garden" is beginning to bloom - with coreopsis and dianthus (Sweet William). The irises are mostly faded, with a few stoic stalks, holding their blooms til the bitter end. I am anxiously awaiting the daylilies opening - the buds are plentiful.

My veggie garden is doing well too! Though we did get "robbed" the other night - something came in and took a bite out of each strawberry that was just about ready to harvest! Ugh! Well, the chickens got a treat anyway. A tighter chain on the gate, and there were finally enough berries for another harvest! Phew!

My "Squarish Foot Garden" is flourishing! I've still got squares to fill...hopefully today I can sow some seeds. I did put a few tomato plants at the end - two each - Yellow Pear and Super Sweet 100's (cherry tomatoes).
As for my other tomato plants, they have gone into buckets.


And a new project was begun...
I have started herb seeds in shallow containers (they are "deep planter pans" with holes drilled in the bottom) that I am hoping to be able to move in and out of the chicken run - for them to have some "grazing" - but they don't like chives, so more for us people! :o) Hopefully they will enjoy some of the other varieties I planted: Garlic chives, common chives, common thyme, lemon balm, lemon grass, oregano, dill, parsley, chamomile, and cumin!

I am hoping that I can get a few more flower seeds going out front and a few more veggies...

I've also been enlisted to give my friends some gardening advice!! Love that - it has helped me focus my thoughts on gardening - since I've been obsessed with my chickens and all that goes to caring for them! (Best part of chicken ownership?? My littlest, Zig, sits on my shoulder and snaps mosquitoes out of the air! So much better than spraying myself with bug repellent! If I could figure out how to make her a harness, I'd take her to work with me everyday!)

Hoping all of you (my loyal readers!) are getting out and getting soil under your nails!

Time to harvest some lettuce and arugula for salad...

Wednesday, April 14, 2010

"Squarish" Foot Gardening!

Hello All! I know it has been nearly a month since my last post, but Chick-Weed-ing has been keeping me busy, as well as my little chickies! One of which has been to the vet for an injury - I am picking her up this afternoon...

So back to my title of "Squarish" Foot Gardening...'WHAT IS THAT??' you ask? Well I'll tell you. It is my version of "Square Foot Gardening", pioneered by Mel Bartholemew. According to his website, "Square Foot Gardening is a simple system that adapts to all levels of experience, physical abilities, and geographical locations. Grow all you want and need in only 20% of the space of a conventional row garden. Save time, water, work and money!"

Basically, you divide your garden bed into square foot areas, with either twine, lattice, whatever you have on hand. Then you plant according to Mel's scheme - so many radishes per square, so many tomatoes per square, etc. There is a lot of great theory behind his method - I have two of his books, and even got to hear him speak! So this year, I was determined to try it...in just one of my veggie beds.

Since the weather was accommodating today, and I was finished up work early, I decided I would at least get out and mark off the bed. The tools I used were: bright yellow mason's string, scissors, ruler, staple gun and hammer.


Then I proceeded to string off sections...this is where the "squarish" comes into play. Because my bed is 9' x 4' (the outside dimension), I couldn't get even 12" x 12" squares. So I have a few that are only 12" x 11" and some that are 12" x 18" - so I will plant larger things there. I stapled the string at the first point and then tied a knot around the staple. I pulled the string tight, measuring to make sure I was close to 12" and stapled it on the other side of the bed. I ran the string along the outside of the bed, put another staple in at 12", then ran it across the bed, until I had all the short lengths done. Then I started the long runners - measuring as I went - and wrapping the string around the existing strings...and hopefully forming some squarish boxes.


Once everything was roped off, I started planting!

In the first square I planted some Burpee Little Caesar that I had started. The other three squares are 3 different types of onions - Candy, Mars, & Copra - that a friend traded me (for some Ramapo tomato seedlings).

I can't wait to get out and plant some of the other things I've got still under lights! And I am hoping that my "squarish" foot gardening does in fact take less work, produce more in smaller spaces, and reduce the amount of weeds I'll have to pull!

If you would like to learn more about Square Foot Gardening, you should visit: Square Foot Gardening Foundation
Happy Gardening!