Monday, December 21, 2015

A Trip to an Ontario Dairy.

While visiting my friends back in November, I got to visit a local dairy, where my good friend Tina's husband Grant is herdsman.

About 2 years ago when I visited them, the dairy was in the middle of installing a new rotary milking parlor.

Rotary Parlor - can milk 30 cows at a time.
The dairy milks about 200 cows twice a day - once in the morning and again in the evening.  When the ladies are ready, they walk onto the parlor where a farm hand dips the teats in disinfectant, wipes them off, then attaches the milkers. As the carousel goes around the ladies are milked. An electric tag on their leg tells the computer what their average milking is as well as other valuable information.

You can see the girls anklets here.
Attaching the milkers.


Milkers attached.


When the cow is done being milked, the milkers automatically detach and drop behind them off the carousel. According to my tour guide Holly, Tina & Grant's 16 year old daughter, some cows have the milkers locked on.  They need to wait for a farmhand to come around and detach the milkers.

The dairy is so well organized!  And they are all about the health, comfort and safety of their herd. 

Deep sand is used for the ladies' comfort.

Feed rations are calculated for the different needs of the different groups.  


A few days old replacement heifer.
The amount of work that goes into a farm like this is astounding.  And I am so thankful for a chance to get an inside peek at the operation.  Grant knows all his "ladies" by name & number.  While we were at the house, we had the most interesting discussion on embryo flushing and how they choose which bulls to breed to and what is available.  It was something we touched on in college, but I was in a general animal reproduction class so not so much detail, and when I worked for the equine vet, only one breeding farm was just beginning to do embryo transfers.


Young heifers in the new barn extension.

I'd like to thank Tina, Grant & Holly who raise sheep on their farm, Fat Duck Acres in Brinston, Ontario for being such great friends and wonderful hosts! And for helping me edit this blog post.

Saturday, November 28, 2015

Broomcorn Processing

This summer I was lucky to be able to attend a few Folk School classes at Historic Cold Spring Village which is just about 2 miles down the road.  It was a new program for the Village and I tried to take full advantage of it.  The first class I participated in was book making.  I got to make 3 small projects the first class and was invited to start a more complicated book the following week.  I will write that up separately... The second class was on broom making!  It was fantastic.  I had a wonderful instructor and was taught how to make a whisk broom and a cob-webber.


My awesome instructor and a hen supervisor.
I was very proud of my two brooms and immediately thought of my friends over at No Frills Farm - they groom BROOMCORN!  I got home and messaged the farmer there, Charles, to ask if he was growing any this year.  He was!  What luck!  So I told him I'd like to place an order for as much as I can get, maybe 100 pieces.  When the fall came and they began harvesting, I reminded him of my order and volunteered to help harvest what I needed.  One Sunday morning I drove to the farm and we headed out to the back field to clip away.  I came home with almost 200 pieces!  I was super excited.  Then the realization that I had to take all the seeds
off sank in.  That was an awful lot of seed.


Broomcorn awaiting processing.


A few quick searches on the internet and I had devised a plan.  I gathered up my materials - a nice big plastic bin for catching the seeds and two combs, left over from my pony showing days - mane combs!  After setting myself up, I decided to video it.


Deseeding the broomcorn.
All deseeded.


I finished up the other two colors of broomcorn today. I just used the metal pulling comb, as it is more efficient.  Now I am letting them dry out a bit before I begin practicing! Don't worry!  I will be documenting the entire process.


A little broomcorn fact for you: Broomcorn is not actually corn!  It is a type of sorghum, Sorghum vulgare var. technicum, that produces long fibrous seed branches, making it a perfect choice for making brooms.  For further information on broomcorn, check out Purdue University's horticulture page on broomcorn here.

Friday, November 27, 2015

Wild Food Dinner!

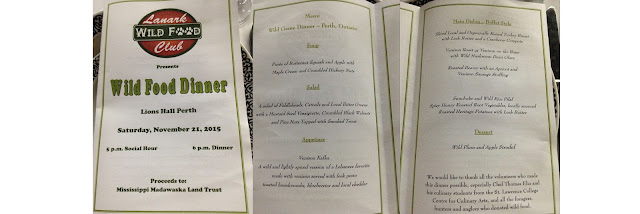
I was fortunate enough to join some friends in Ontario, Canada last week at a Wild Food Dinner hosted by the Lanark Wild Food Club.  The best part was getting to try some foods I would never have been able to try!  My favorite by far was the roasted beaver.  Not something found down here in Cape May County. (This will be a photo heavy post!  Though mere words and photos cannot describe the taste.)


The menu was varied and all the food was delicious.  From the appetizers such as wild harvested mushrooms on toast with wild leek ricotta, venison sausage, First Nations smoked trout to the main dishes of venison roast & roasted beaver to the dessert of apple & wild plum strudel.

Wild Picked Mushrooms with Herbed Ricotta

Pickerel Fritter & First Nations Smoked Trout

Halved Baked Potato with fresh Pickerel & Wild Leek Butter

Salad of local bitter greens, fiddle heads, cattail palm, smoked trout, thinly sliced radishes & beets.

Close up of the Fiddle Heads & Cattail Palm
Puree of Butternut Squash & Apple with Apple cider and Maple Cream

Venison Kafka, Wild Blueberries & Local Cheddar

Roasted Beaver with Venison sausage stuffing.

Wild Plum & Apple Strudel

A nice Canadian Charonnay to accompany the entire meal.
 I even won a door prize!  I picked up a book on Edible Wild Plants, which I hope to utilize here at home.

Kudos to the Lanark Wild Foods Club for hosting such a fantastic event, all the foragers, anglers, & hunters who donated the food; as well as to the team of culinary students from St. Lawrence College Centre for Culinary Arts for such a delicious meal.

My friends have been forewarned that I will be making this an annual pilgrimage.  I am so grateful for good friends!


Tuesday, March 10, 2015

Forays into Fermenting!

What is fermentation?  The most common fermentation is lacto-fermentation, whereby food is preserved in a brine that provides an anaerobic (non-oxygen) & acidic environment for the lactobacillus (bacteria - YES, bacteria!) to convert the sugars in the food into lactic acid.  This type of preservation enhances the nutrient content of what is being preserved. BONUS!
 
I have been curious about fermenting for some time now.  My science background unfortunately, has given me just enough knowledge to be paranoid about giving my family botulism, so I never attempted anything.  Food preservation is something I've been dabbling in for several years - canning, freezing and dehydrating mainly. So why not pickling, fermenting, smoking, etc.? (Smoking is in the works.)  I needed to do more research.

Sauerkraut seemed like a very basic place to start.  Why did I even want to try this when I can buy it so readily?  Well, it is just one more skill I wanted to learn.  But do I go it alone?  I just wasn't brave enough.
 
After chatting with a friend, I found out that our local family-owned organic market offers lots of different classes.  In January I took their class on making Sauerkraut, which is part of their "Culture Club" Series. It was extremely easy to do and I was anxiously awaiting what I hoped would be the best kraut I had ever tasted. After 5 days, I unfortunately found mold growing around the caraway seeds that I had added.

Lesson #1: DO NOT ADD SEEDS!

Batch 1 with Caraway Seed.
 
Lesson learned.   Attempt number two was much more successful.  A good friend and her 5 year old son helped me with the mashing.

Batch #2: Success!
 
By the third batch, I was hooked and had upgraded my equipment.  Luckily I remembered to take several photos to document the process. 

Let's get fermenting! 

Equipment needed:
Food grade container(s) (I use glass Ball jars)
Lid(s)
Weight (I use a jelly jar with salt water solution, you can also use CLEAN rocks, a plate, a baggie filled with water, etc. There are many options.)
Cabbage
Sea salt
Potato masher/Kraut Masher/Clean Hands
Optional: Airlock, crock, special fermenting jars


Step one is easy enough. Quarter the cabbage and remove the thick stem. Then shred the cabbage. If you have a mandolin, this works well. A sharp knife will give you nice thin slices. A food processor will lessen the work even further. How fine or course you like your kraut will depend on what you used to shred it.


For every 5 pounds of cabbage you will need 1 tablespoon of sea salt. If you don't have sea salt, any fine salt that is UN-iodized will work. Add the salt to the cabbage. Now for the elbow grease! With your hands you can mash and grind and squeeze the cabbage until liquid starts being released. You can also use a potato masher. Special wooden "kraut mashers" are available but rather costly.  I use my hands - depending on the water content of the cabbage, this can go very quickly.


You can see the liquid at the bottom of the bowl.

Once you have a nice juicy mess, you need to start packing the cabbage down tightly into your vessel. I used large mouth Ball jars. (I splurged on a 1 gallon crock but haven't ventured that far yet!) My latest purchase was a set of special lids with airlocks. The airlock means I no longer have to remember to "burp" the jar to release the gases. Pack all the cabbage down to get rid of air pockets - they will allow for aerobic fermentation which is NOT what you want! - and until the brine (liquid) level is above the level of the cabbage.


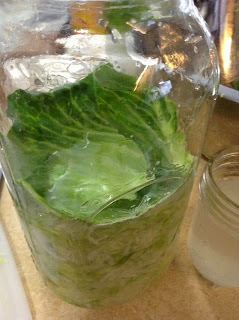
Now that all of the cabbage is under the brine, you can put a nice big leaf on top. I found this helped keep the little pieces that float below the brine.
Once I was sure that everything was submerged, I added in a small jelly jar filled with a saline solution (a bit of kosher salt and water) as a weight. Making sure everything was still as I wanted it, and that the upper insides of the jar were free of debris, I added on my new cap with airlock.  Any cabbage stuck to the sides above the brine are likely to mold!  So I wipe down the sides as best I can.  Any signs of mold for me is a "TOSS IT!" situation.  There is no reason to risk it.

  
Jelly jar weight added.
 
Lid secured.

And now we wait.  If you just use the regular canning lids, you will need to "burp" your jars daily.  Do this by just loosening the ring until you hear the little hiss - do NOT remove the lid!  You do not want to introduce air into this. 

This batch was given about 5 days. After 3 or 4 days you can taste some to see how you like it.  I like mine with a bit of bite. 5 days it was still a bit mild. By day 7 it was just right for me.  I took off the airlock and took out the weight and large leaf.  The whole jar with a new lid went into the fridge.  Some people will leave theirs for weeks or even months!  I have not gotten that brave. Next time I will fill the jar a bit more.

I have found that it will continue to ferment, albeit at a much slower rate, in the refrigerator so I must "burp" the jar every few days.  I eat mine right out of the jar!  Good for the probiotics. I also cooked some with some pork meatballs - it was just as delicious.

I am a total newbie at this, but I wanted to share my experiences so far.  Sauerkraut was a great starter project for me.  There is a ton of great information out there.  Talk to friends who ferment.  Look for local classes or get some books from the library.

I have moved on to my next fermenting adventure...brewing Kombucha Tea!  (But more on that later...)

Happy Fermenting!