Please - DON'T COME AGAIN!"
Something was eating my collards...but what are a few holes in the leaves among friends? UNTIL - there were more holes than leaves...
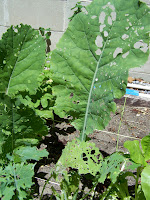
Upon turning over a leaf (not a new one...just an old one) I saw one of the culprits - a small green worm like critter that was munching away at my collards.
Well, I had seen some white cabbage moths flitting around a week so before...I fed those few holey leaves to my chickens and they just gobbled them up! They really LOVE collards!
A few days later, I was looking at the garden...and almost ALL of my collards looked like they'd been shot with buckshot! How many more cabbage moth worms are there? I didn't only find the familiar little green guys...to my complete surprise, I found a bunch of these...
Meet The Cross-Striped Cabbageworm! Kind of a pretty little thing really. The adult cross-striped cabbageworm (moth) isn't so pretty - sort of pale yellowish-brown.
So, what about it? Well, the cross-striped cabbageworm (from here on out referred to as CSC to enable me to type quicker...) are enamoured with cabbage (hence the name!), collards, turnips, cauliflower, broccoli...and any other related crops! Oh joy! I had turnips, from my hoop house, but they bolted so I ripped them out...but I still have collards and cabbage! UGH!!
Sigh...so what do these little buggers do?
Well, the larvae will eat very large oval shaped holes in the leaves and can burrow into a developing cabbage head. This would be no big deal if I had acres and acres of collards and cabbage...but not so great when you have a small veggie patch in your backyard. No wonder they just decimated everything in their path! When I found particularly infested leaves and stalks, I carefully plucked them, and fed them, leaves and all, to my chickens! My two Cochin pullets ate them like candy! Plucking them off one by one before even bothering with the greens!
But for those of you without chickens...you can hand pick the CSC's from your crops - and then DESTROY THEM!! Don't just knock them to the ground...they will find their way back. And since they can overwinter in their pupal stage, just beneath the soil...you may want to destroy all that is left after you have harvested the heads or leaves you desire. You can plow them under, but I'd prefer to destroy them. Another method, as suggested by the Rutger's Cooperative Extension is to use" parasites, predators and parasitoid wasps to help control the CSCs"...but with a small plot, hand picking will probably be sufficient, though time consuming. Using Bt can also be beneficial - if you are inclined to use pesticides.
As for me, I've pulled up my collards, fed the remaining to my chooks, and am closely watching the smaller collards and my lovely Swiss chard - that is just about ready for some harvesting...found a few on them too...luckily my chooks love greens!! And CSCs! Happy Hunting!
Tuesday, June 15, 2010
Sunday, May 30, 2010
Gardens Update!
Wow - have I been gardening up a storm for the last month and a half...unfortunately, it has only been minimally on my own gardens!! My clients' gardens are looking splendid, so at least I am doing my job.
My own gardens have also been doing well without me! Guess that is a good thing. My "Slope Garden" is beginning to bloom - with coreopsis and dianthus (Sweet William). The irises are mostly faded, with a few stoic stalks, holding their blooms til the bitter end. I am anxiously awaiting the daylilies opening - the buds are plentiful.
My veggie garden is doing well too! Though we did get "robbed" the other night - something came in and took a bite out of each strawberry that was just about ready to harvest! Ugh! Well, the chickens got a treat anyway. A tighter chain on the gate, and there were finally enough berries for another harvest! Phew!
My "Squarish Foot Garden" is flourishing! I've still got squares to fill...hopefully today I can sow some seeds. I did put a few tomato plants at the end - two each - Yellow Pear and Super Sweet 100's (cherry tomatoes).
As for my other tomato plants, they have gone into buckets.
And a new project was begun...
I am hoping that I can get a few more flower seeds going out front and a few more veggies...
I've also been enlisted to give my friends some gardening advice!! Love that - it has helped me focus my thoughts on gardening - since I've been obsessed with my chickens and all that goes to caring for them! (Best part of chicken ownership?? My littlest, Zig, sits on my shoulder and snaps mosquitoes out of the air! So much better than spraying myself with bug repellent! If I could figure out how to make her a harness, I'd take her to work with me everyday!)
Hoping all of you (my loyal readers!) are getting out and getting soil under your nails!
Time to harvest some lettuce and arugula for salad...
My own gardens have also been doing well without me! Guess that is a good thing. My "Slope Garden" is beginning to bloom - with coreopsis and dianthus (Sweet William). The irises are mostly faded, with a few stoic stalks, holding their blooms til the bitter end. I am anxiously awaiting the daylilies opening - the buds are plentiful.
My veggie garden is doing well too! Though we did get "robbed" the other night - something came in and took a bite out of each strawberry that was just about ready to harvest! Ugh! Well, the chickens got a treat anyway. A tighter chain on the gate, and there were finally enough berries for another harvest! Phew!
My "Squarish Foot Garden" is flourishing! I've still got squares to fill...hopefully today I can sow some seeds. I did put a few tomato plants at the end - two each - Yellow Pear and Super Sweet 100's (cherry tomatoes).
As for my other tomato plants, they have gone into buckets.
And a new project was begun...
I have started herb seeds in shallow containers (they are "deep planter pans" with holes drilled in the bottom) that I am hoping to be able to move in and out of the chicken run - for them to have some "grazing" - but they don't like chives, so more for us people! :o) Hopefully they will enjoy some of the other varieties I planted: Garlic chives, common chives, common thyme, lemon balm, lemon grass, oregano, dill, parsley, chamomile, and cumin!
I am hoping that I can get a few more flower seeds going out front and a few more veggies...
I've also been enlisted to give my friends some gardening advice!! Love that - it has helped me focus my thoughts on gardening - since I've been obsessed with my chickens and all that goes to caring for them! (Best part of chicken ownership?? My littlest, Zig, sits on my shoulder and snaps mosquitoes out of the air! So much better than spraying myself with bug repellent! If I could figure out how to make her a harness, I'd take her to work with me everyday!)
Hoping all of you (my loyal readers!) are getting out and getting soil under your nails!
Time to harvest some lettuce and arugula for salad...
Wednesday, April 14, 2010
"Squarish" Foot Gardening!
Hello All! I know it has been nearly a month since my last post, but Chick-Weed-ing has been keeping me busy, as well as my little chickies! One of which has been to the vet for an injury - I am picking her up this afternoon...
So back to my title of "Squarish" Foot Gardening...'WHAT IS THAT??' you ask? Well I'll tell you. It is my version of "Square Foot Gardening", pioneered by Mel Bartholemew. According to his website, "Square Foot Gardening is a simple system that adapts to all levels of experience, physical abilities, and geographical locations. Grow all you want and need in only 20% of the space of a conventional row garden. Save time, water, work and money!"
Basically, you divide your garden bed into square foot areas, with either twine, lattice, whatever you have on hand. Then you plant according to Mel's scheme - so many radishes per square, so many tomatoes per square, etc. There is a lot of great theory behind his method - I have two of his books, and even got to hear him speak! So this year, I was determined to try it...in just one of my veggie beds.
Since the weather was accommodating today, and I was finished up work early, I decided I would at least get out and mark off the bed. The tools I used were: bright yellow mason's string, scissors, ruler, staple gun and hammer.
Then I proceeded to string off sections...this is where the "squarish" comes into play. Because my bed is 9' x 4' (the outside dimension), I couldn't get even 12" x 12" squares. So I have a few that are only 12" x 11" and some that are 12" x 18" - so I will plant larger things there. I stapled the string at the first point and then tied a knot around the staple. I pulled the string tight, measuring to make sure I was close to 12" and stapled it on the other side of the bed. I ran the string along the outside of the bed, put another staple in at 12", then ran it across the bed, until I had all the short lengths done. Then I started the long runners - measuring as I went - and wrapping the string around the existing strings...and hopefully forming some squarish boxes.
Once everything was roped off, I started planting!
In the first square I planted some Burpee Little Caesar that I had started. The other three squares are 3 different types of onions - Candy, Mars, & Copra - that a friend traded me (for some Ramapo tomato seedlings).
I can't wait to get out and plant some of the other things I've got still under lights! And I am hoping that my "squarish" foot gardening does in fact take less work, produce more in smaller spaces, and reduce the amount of weeds I'll have to pull!
If you would like to learn more about Square Foot Gardening, you should visit: Square Foot Gardening Foundation
Happy Gardening!
Tuesday, March 23, 2010
Chick-Weed's Chick Adventures
Yes, you read it correctly! I picked up my chickies yesterday!! 6 little girls. So cute, if I do say so myself. It was hard to choose which ones!
I'm not positive of the breeds, but it looks like 3 Rhode Island Reds, 2 Cochin, and the 6th is either RIR or a Buff Orpington...only time will tell.
Getting ready to build them a coop and run...I'm trying to do most if not all of the construction with freecycle materials.
Without further ado - Here they are! The two Cochins are named - "Zig" (my nephew's chick) and "Angel Allabeena" (my niece's chick)!
Sunday, March 21, 2010
Happy Spring!
It is official! Yesterday was the Vernal Equinox and nature sure knows it! I was able to take a quick walk around my property yesterday and survey everything. Luckily, all the snow we had, seems to have only had minimal impact on my azaleas, and my rhodos have snapped back and are looking good.
I love seeing all the day lilies peeking up from the soil. I was so inspired by the new sprouts, that when I was in the garden center, I bought a few things...which I said I wasn't going to do. I picked up some asparagus crowns and some freesia bulbs. Now, where to put them? This addiction to gardening is out of control! But I love it!
I just spent a week in Ontario visiting friends. They still had quite a bit of snow and ice still on the ground, but the weather was heavenly. We talked about her garden plans - she's putting in a pond this year - and I can't wait to see it!
While in Canada, I got to go to Montréal and visit the Jardin Botanique de Montréal! Most of the outdoor garden beds were still under their covers and some snow, but as it was raining that day, I didn't mind spending time strolling through the greenhouses. I lucked out and arrived during the middle of their "Butterflies Go Free" exhibit! A gorgeous display of flora and fauna - hundreds of butterflies and moths that they have hatched out. So here is a bit of spring from indoors...
Well, I'm off to start clearing up the last of the leaves from the beds and potting up some seedlings!
Wednesday, March 3, 2010
Seed Starting...Getting Started!
Well, it is finally that time…I got my hands dirty (with the help of my 3 ½ year old niece) and got my seeds started. Phew. This is my third season starting my own seeds, and I am a novice at best! Each year I do something a little different to improve upon last year’s crop.
So how does one start seeds? Well, first things first. Plan! Before starting your favorite seeds indoors, you must be certain that you have room outside to put them once they are ready! Another part of planning, is deciding which seeds to start and the best time to start them.
Once I’ve decided which seeds to start indoors (vs. what I am going to direct sow in the gardens in spring) I gather my supplies. Now you are probably thinking, do I need to buy seed starter trays, expensive grow lights, etc.? The answer is NO! I personally do use the multi-cell starter trays, but that is my own personal preference. However, once the seedlings need to be potted up, they go into containers I have collected over the years – food containers are fantastic – sour cream, ricotta cheese, yogurt…and the easy way to put holes in the bottom for drainage? A corkscrew. Yes, you read that correctly! I use an old broken corkscrew, gently pressing the point into the bottom of the “pots” to make multiple holes around the outer rim and a half dozen in the center. And if cared for properly, these containers last from year to year! I clean mine and store them in the garage, out of the sun. I also save pots from purchased plants! Just give everything a nice soak in a mild bleach solution! As for grow lights – I use 2 4’ shop lights – each with one soft white bulb and one cool white bulb. The mix of bulbs provides different wavelengths of light – totally acceptable for starting seeds.
I have found that using a soil-less starting mix works best for me. I pour a good amount into a small tub and gradually add water to moisten. It is important to not over water the mix. You want it to sort of stay together when you squeeze a handful of it. It shouldn’t clump or drip. A little on the drier side is best.
Once the mix is ready, I begin filling my containers, compressing it lightly, just to make sure that the container is filled. Then, with seeds in hand, I begin sowing! For very tiny seeds, I will put in a small pinch 3-5 seeds, in each square of a 72 cell flat. For larger seeds, such as those for Swiss chard, I place only one per cell. Just follow the directions for sowing depth, lightly cover with some more mix if the packet calls for it, place in a marker and you are done!
I cover my flats with the plastic domes they came with – but I’ve used cling-film in the past, anything that helps keep the containers moist. Then the trays go onto the grow stand (that I built the 3 seasons ago, and plan on adding one more light to the top) to germinate!
I write down everything in my Garden Journal and then I wait!
Here is a quick list of supplies, to help you get started!
Give it a try! It can be so satisfying to watch the emerging seedlings, knowing in a few months you will have gorgeous and nutritious veggies from a small effort on your part and a few tiny seeds. Isn’t nature grand?
Next time…I’ve got them sown, NOW what do I do??
So how does one start seeds? Well, first things first. Plan! Before starting your favorite seeds indoors, you must be certain that you have room outside to put them once they are ready! Another part of planning, is deciding which seeds to start and the best time to start them.
Once I’ve decided which seeds to start indoors (vs. what I am going to direct sow in the gardens in spring) I gather my supplies. Now you are probably thinking, do I need to buy seed starter trays, expensive grow lights, etc.? The answer is NO! I personally do use the multi-cell starter trays, but that is my own personal preference. However, once the seedlings need to be potted up, they go into containers I have collected over the years – food containers are fantastic – sour cream, ricotta cheese, yogurt…and the easy way to put holes in the bottom for drainage? A corkscrew. Yes, you read that correctly! I use an old broken corkscrew, gently pressing the point into the bottom of the “pots” to make multiple holes around the outer rim and a half dozen in the center. And if cared for properly, these containers last from year to year! I clean mine and store them in the garage, out of the sun. I also save pots from purchased plants! Just give everything a nice soak in a mild bleach solution! As for grow lights – I use 2 4’ shop lights – each with one soft white bulb and one cool white bulb. The mix of bulbs provides different wavelengths of light – totally acceptable for starting seeds.
I have found that using a soil-less starting mix works best for me. I pour a good amount into a small tub and gradually add water to moisten. It is important to not over water the mix. You want it to sort of stay together when you squeeze a handful of it. It shouldn’t clump or drip. A little on the drier side is best.
Once the mix is ready, I begin filling my containers, compressing it lightly, just to make sure that the container is filled. Then, with seeds in hand, I begin sowing! For very tiny seeds, I will put in a small pinch 3-5 seeds, in each square of a 72 cell flat. For larger seeds, such as those for Swiss chard, I place only one per cell. Just follow the directions for sowing depth, lightly cover with some more mix if the packet calls for it, place in a marker and you are done!
I cover my flats with the plastic domes they came with – but I’ve used cling-film in the past, anything that helps keep the containers moist. Then the trays go onto the grow stand (that I built the 3 seasons ago, and plan on adding one more light to the top) to germinate!
I write down everything in my Garden Journal and then I wait!
Here is a quick list of supplies, to help you get started!
- Soil-less seed starting mix
- Seeds
- Containers
- Plant markers (either store bought or popsicle sticks or plastic knives)
- Plastic to cover
- Warm place (some people use the top of the fridge!)
- Light source (shop lights, grow lights, a nice WARM sunny windowsill!)
Give it a try! It can be so satisfying to watch the emerging seedlings, knowing in a few months you will have gorgeous and nutritious veggies from a small effort on your part and a few tiny seeds. Isn’t nature grand?
10 Days after planting!
Next time…I’ve got them sown, NOW what do I do??
Friday, February 12, 2010
All this white stuff...
Green has been far from my mind. We've been bombarded by snow storms this last week - losing our cable (therefore no internet) and electric. Now that I am back on line, I find that gardening has been far from my mind. I am not complaining mind! I love the snow! We haven't had snow accumulations like this in ages!
In this storm several of my lovely holly trees snapped off under the weight of the snow, as have a few of my fuller cedars; it has been rather depressing. One bright spot though, my hoop house is still in one piece! How the veggies underneath are doing remains to be seen! I cannot get the garden gate open with two feet of snow surrounding it, and as I have yet to dig out my car and I need to go grocery shopping...
So today's blog is going to just be a few photos.
Holly Trees
Sparrow on a snowfree spot in the sun
Barn buddies
Hoop House - half way through first storm - Still standing!
I should be starting my seeds soon... Until then - Keep warm & dream green!
Wednesday, January 27, 2010
Stroll Through a Winter Garden
The chilliest day we have had all week, and I decide to go out and take photos (and stock) of my gardens. I find I need to fill up my time with such tasks as I eagerly await my new seed starting flats so I can start getting my hands dirty. It also stems from my attendance last night at a lecture by a fellow Master Gardener on Garden Pests & Beneficial Organisms. Will this be the year that I really look for pests in the garden? And keep it up beyond May 1st?
I did not find any little creatures hiding in the garden, but to my surprise and delight, I noticed several early birds (besides the daffodils which I mentioned in my last blog):iris, yarrow, and lilac! I also stumbled across a lovely little moss making its home at the base of a small retaining log in my Hollow Shade Garden. So though I may have been moaning a bit about all the blah of a winter garden, it isn't that long of a time without some green.
Here are a few bits of green for you!
Daffodils & some wild strawberry
White Lilac buds
Moss in the Hollow Shade Garden
Iris peeking out
Happy Gardening!
Wednesday, January 20, 2010
Spring's sprung already? Where's my Garden Journal?
While standing in the snow flurries this morning, holding the pony, awaiting a visit from the farrier, I happened to notice the first signs of green pushing up! I couldn't believe it. I had to look twice. My one little patch of daffodils has decided to start growing.
Upon closer inspection, I concluded they began sprouting some time last weeek. Surely that is too soon, or so I thought. I decided to scan through my Garden Journal to see if I noticed this in the past year or so. And in mid-January 2008, there it was, a small note about the daffodils sprouting. A note later, confirmed that sprouting early didn't hurt the blooms. They were full and plentiful.
The Garden Journal, one of my favorite "tools." You may be asking yourself, do I really need one? The answer is YES! Well, you should at least consider it if you are serious about your gardening.
Your journal doesn't need to be anything fancy. I myself use a 3-ring binder. I set my journal up with calendar pages for each month and plenty of loose leaf in between. I keep separate sections for tips and ideas; projects lists; plant lists; garden diagrams; budget. Everything that has to do with my gardens goes in.
As you can see, I like to document. I take stock in my evergreens - do they look like they got damaged over the winter? How well do they come back, if at all? I cut the photos out of the catalogs of things I purchased and stick them on sheets behind my plant lists. But that is just me - it is the science geek in me coming out. At the end of the season, I can move the pages for the year to the back, and start again in January! I only have to start a new binder when one gets full. Good thing I bought the 3" wide binder!
Get started! Grab a composition book, 3-ring binder, spiral notebook, or a bound journal, pencil or pen and start documenting! You'll be glad you did.
I'm glad I take notes - now I know that I don't need to worry about my little daffodils being early, they typically sprout this time of year.
Upon closer inspection, I concluded they began sprouting some time last weeek. Surely that is too soon, or so I thought. I decided to scan through my Garden Journal to see if I noticed this in the past year or so. And in mid-January 2008, there it was, a small note about the daffodils sprouting. A note later, confirmed that sprouting early didn't hurt the blooms. They were full and plentiful.
The Garden Journal, one of my favorite "tools." You may be asking yourself, do I really need one? The answer is YES! Well, you should at least consider it if you are serious about your gardening.
Your journal doesn't need to be anything fancy. I myself use a 3-ring binder. I set my journal up with calendar pages for each month and plenty of loose leaf in between. I keep separate sections for tips and ideas; projects lists; plant lists; garden diagrams; budget. Everything that has to do with my gardens goes in.
- Seeds ordered
- Seeds started and when
- When things sprout
- When seedlings go into the ground
- Garden diagrams
- Garden projects - new beds, transplanting
- Photos - as things sprout, stages of the garden
- Plant list
As you can see, I like to document. I take stock in my evergreens - do they look like they got damaged over the winter? How well do they come back, if at all? I cut the photos out of the catalogs of things I purchased and stick them on sheets behind my plant lists. But that is just me - it is the science geek in me coming out. At the end of the season, I can move the pages for the year to the back, and start again in January! I only have to start a new binder when one gets full. Good thing I bought the 3" wide binder!
Get started! Grab a composition book, 3-ring binder, spiral notebook, or a bound journal, pencil or pen and start documenting! You'll be glad you did.
I'm glad I take notes - now I know that I don't need to worry about my little daffodils being early, they typically sprout this time of year.
Saturday, January 9, 2010
Composting 101
How can you help your garden and cut down on garbage at the same time? By COMPOSTING! But what is composting, why should you compost, and how do you do it?
Composting is a natural process where organic materials decompose and are recycled into a dark, crumbly, earthy smelling soil conditioner known as “compost.” To gardeners, this is known as "black gold." Composting organic kitchen wastes and yard waste cuts down on what goes into our landfills and we can all benefit from that! It can save you money. Adding compost to your garden improves soil structure, promotes soil fertility, reduces chemical additives (commercial fertilizers) and stimulates healthy roots! All it costs is a bit of time to get started with your compost pile.
Let's get started! The first thing you need to do is to select a site in your yard or garden to put your compost pile or bin. Placement of the bin should be convenient and on level, well-drained ground. You do not want to put your compost bin in a low spot, where it stays wet, nor in the sunniest spot, where it may dry out. Also take into consideration who can see it! Some neighbors may consider your compost bin an eyesore.
The minimum size for a compost pile is 3'x3'x3', but larger than 5’x5’x5’ will inhibit air getting into the middle of the pile. Some people like to have a bin to put their composting materials in. My own bin is made from a piece of old wire fencing and unused fence posts formed into a square, where the front "panel" can be opened for ease in turning the pile. You may chose this method, or you can build a bin out of pressure treated wood and wire mesh, cinder blocks, whatever you have to hand. Some people have multiple bins to move the compost as it breaks down, but for small yards and gardens, multiple bins aren't necessary. Ready-made bins and composting "barrels" are available from many gardening retailers. Whatever method you chose, make sure there is ample ventilation. Air circulation is an important component in the decomposition process. The microorganisms in the compost pile need water, nutrients (such as nitrogen & carbon) and oxygen in order to live.
Once the location is chosen, it is time to get started adding organic matter. Here are a few "Do's and Dont's" of composting.
DO Compost:
How to care for your compost pile: Caring for your compost pile is where the cost of time comes in. If you aren't in a hurry to get your compost, just start adding materials and turn the pile with a pitchfork once a month. With minimal effort, you should have usable compost in 12-18 months. Can't wait that long? More effort will be needed. Start off with green material (grass clippings, veggie scraps) and mix with some brown material (leaves). Wet the pile until it is damp - like a rung out sponge. Turn the pile twice a week, making sure the moisture level stays consistent, in order to aerate the pile. The microorganisms that are working to break down the matter need oxygen. A byproduct of decomposition is heat! A well maintained compost pile will reach temperatures between 110° and 160°F. If this temperature range is reached, it will help kill any weed seeds that may have gotten into the pile. Special compost thermometers can be purchased, but aren't necessary.
You will know your compost is ready to use when it is dark, brown, crumbly and it should have an earthy odor. It shouldn't smell rotten or be moldy. Any of the original materials that went into the compost pile should no longer be recognizable in finished compost, except for some woody pieces. The compost can be used as soil amendments, mulch, or in potting mixes!
For more in depth information on composting, try some of these links:
How To Compost
From Rutgers University:
Home Composting
For vermicomposting (composting with worms)
Happy Composting!
Composting is a natural process where organic materials decompose and are recycled into a dark, crumbly, earthy smelling soil conditioner known as “compost.” To gardeners, this is known as "black gold." Composting organic kitchen wastes and yard waste cuts down on what goes into our landfills and we can all benefit from that! It can save you money. Adding compost to your garden improves soil structure, promotes soil fertility, reduces chemical additives (commercial fertilizers) and stimulates healthy roots! All it costs is a bit of time to get started with your compost pile.
Let's get started! The first thing you need to do is to select a site in your yard or garden to put your compost pile or bin. Placement of the bin should be convenient and on level, well-drained ground. You do not want to put your compost bin in a low spot, where it stays wet, nor in the sunniest spot, where it may dry out. Also take into consideration who can see it! Some neighbors may consider your compost bin an eyesore.
The minimum size for a compost pile is 3'x3'x3', but larger than 5’x5’x5’ will inhibit air getting into the middle of the pile. Some people like to have a bin to put their composting materials in. My own bin is made from a piece of old wire fencing and unused fence posts formed into a square, where the front "panel" can be opened for ease in turning the pile. You may chose this method, or you can build a bin out of pressure treated wood and wire mesh, cinder blocks, whatever you have to hand. Some people have multiple bins to move the compost as it breaks down, but for small yards and gardens, multiple bins aren't necessary. Ready-made bins and composting "barrels" are available from many gardening retailers. Whatever method you chose, make sure there is ample ventilation. Air circulation is an important component in the decomposition process. The microorganisms in the compost pile need water, nutrients (such as nitrogen & carbon) and oxygen in order to live.
Once the location is chosen, it is time to get started adding organic matter. Here are a few "Do's and Dont's" of composting.
DO Compost:
- Kitchen scraps - vegetable scraps, egg shells, coffee grounds
- Garden debris & yard waste - weeds, flowers, leaves, grass clippings
- Sawdust (from untreated lumber)
- Wood ash
- Meat scraps
- Grease
- Pet feces
- Food with grease or soap residue
- Weeds with seeds
- Diseased or infested plants
How to care for your compost pile: Caring for your compost pile is where the cost of time comes in. If you aren't in a hurry to get your compost, just start adding materials and turn the pile with a pitchfork once a month. With minimal effort, you should have usable compost in 12-18 months. Can't wait that long? More effort will be needed. Start off with green material (grass clippings, veggie scraps) and mix with some brown material (leaves). Wet the pile until it is damp - like a rung out sponge. Turn the pile twice a week, making sure the moisture level stays consistent, in order to aerate the pile. The microorganisms that are working to break down the matter need oxygen. A byproduct of decomposition is heat! A well maintained compost pile will reach temperatures between 110° and 160°F. If this temperature range is reached, it will help kill any weed seeds that may have gotten into the pile. Special compost thermometers can be purchased, but aren't necessary.
You will know your compost is ready to use when it is dark, brown, crumbly and it should have an earthy odor. It shouldn't smell rotten or be moldy. Any of the original materials that went into the compost pile should no longer be recognizable in finished compost, except for some woody pieces. The compost can be used as soil amendments, mulch, or in potting mixes!
For more in depth information on composting, try some of these links:
How To Compost
From Rutgers University:
Home Composting
For vermicomposting (composting with worms)
Happy Composting!
Tuesday, January 5, 2010
Cabin Fever
I love the cold of winter. I like seeing the trees dormant. Sure I miss going out and spending time in my garden, getting soil under my nails, and mud all over my boots. I do have my hoop house, but that pretty much takes care of itself.
January is that time of year that every gardener looks forward to, when they are experiencing cabin fever and are frantically thumbing through the nursery and seed catalogs and searching websites for new and exciting specimens; placing orders and planning out their gardens. This year I almost dread it. The catalogs are flooding my mailbox and feeding my cabin fever! How long until the last frost date? When do I need to place my order by? Where will I put all these plants?? What type of weather will we get in the spring? Will my efforts be in vain? Ugh!
I have found myself mentally circling all the things I'd like to purchase this year, though I know I don't really need anything nor can I afford anything new this year. I did go a bit seed-happy last year, buying a packet of this or that each time I went past a display! But this year, I need to stick to my budget, which is next to zero. How will I fill my desire to grow things?
Luckily, I did not plant every seed I purchased last year. I saved half of each packet of vegetable seeds and stored them in a cool dry place. I also saved seeds from my own garden for favorite self-seeding annuals and perennials, along with a strange collection of interesting blooms and cuttings from a few clients - who were more than happy to share with me.
My preparation for the coming spring is planning on what seeds to start, when, and where to transplant the seedlings. I will be adding a third light to my grow stand. When the ground thaws out, I am going to start cutting a new bed for a mix of herbs and veggies.
How to stick to a garden budget? Here are a few tips to get started.
Until I get my seeds started, I will still thumb through my catalogs while sipping hot tea, looking out upon my dormant beds dreaming of what my garden will become and await the first bright green leaves to push their way out of the soil...
January is that time of year that every gardener looks forward to, when they are experiencing cabin fever and are frantically thumbing through the nursery and seed catalogs and searching websites for new and exciting specimens; placing orders and planning out their gardens. This year I almost dread it. The catalogs are flooding my mailbox and feeding my cabin fever! How long until the last frost date? When do I need to place my order by? Where will I put all these plants?? What type of weather will we get in the spring? Will my efforts be in vain? Ugh!
I have found myself mentally circling all the things I'd like to purchase this year, though I know I don't really need anything nor can I afford anything new this year. I did go a bit seed-happy last year, buying a packet of this or that each time I went past a display! But this year, I need to stick to my budget, which is next to zero. How will I fill my desire to grow things?
Luckily, I did not plant every seed I purchased last year. I saved half of each packet of vegetable seeds and stored them in a cool dry place. I also saved seeds from my own garden for favorite self-seeding annuals and perennials, along with a strange collection of interesting blooms and cuttings from a few clients - who were more than happy to share with me.
My preparation for the coming spring is planning on what seeds to start, when, and where to transplant the seedlings. I will be adding a third light to my grow stand. When the ground thaws out, I am going to start cutting a new bed for a mix of herbs and veggies.
How to stick to a garden budget? Here are a few tips to get started.
- Check with fellow gardeners or local garden clubs, see if anyone you know saves seeds and is willing to swap! Check out gardening websites to see if they have seed exchanges.
- Need to thin out some of your plants? See if a neighbor is willing to take some in exchange for something of theirs - maybe you have a green thumb for flowers and your neighbor excels with vegetables.
- If you live in a rural area, see if the pony owner down the street is willing to let you haul away an older section of their manure pile - many will be glad to be rid of it! And you can get a great deal of free compost! And don't forget to thank them with some of the produce!
- If you don't do so already, save seeds or take cuttings from your favorite plants this year. Make sure you do your research first! Many specimens are cultivars and the seed you save may not produce the traits of the parent plant that you so admire. See if cuttings are a good way to replicate the parent plant!
Until I get my seeds started, I will still thumb through my catalogs while sipping hot tea, looking out upon my dormant beds dreaming of what my garden will become and await the first bright green leaves to push their way out of the soil...
Subscribe to:
Posts (Atom)